Rome wasn’t built in a day, and neither are our websites. We have spent hours and hours building our WordPress websites. Imagine it vanishing at the blink of an eye. That would be an absolute nightmare, right?
There is a high chance that this might happen at least once on your website journey. Being cautious is important because the internet is a crazy place, my friend. There are hackers, various malware, poorly coded plugins, outdated themes, etc. that could break and erase your site and its data easily.
Does this mean you cannot have a secured website?
Oceans and waves are also dangerous, does that stop a scuba diver from going into the ocean on a normal day? No, right? It’s the same with websites! With proper training and fail-safe methods, you’ll always be able to backup and restore your WordPress website back to its working state.
There are multiple ways to backup and restore your WordPress website. Let’s explore each method quickly. Why wait? Let’s dive in 🤿
Index
- WordPress backup and its importance
- Ways to Restore WordPress website
- How to Backup and Restore your WordPress website
- WordPress Backup Strategy
- FAQs
WordPress backup and its importance
A WordPress backup is a complete copy of your site (i.e., data, files, and folders) that is stored on your local desktop, hosting server, and file storage servers. This acts as a fail-safe method and helps restore your site after a data loss event. In simple terms, it is like a checkpoint in your favorite arcade game, you can continue from where you are.
WordPress powers almost 43.1% of all the websites on the internet. Its popularity attracts the eyes of hackers who are waiting to exploit the platform’s security vulnerability. Cyberattacks can affect certain sections of your website or even destroy it. Your WordPress site backup acts as a lifesaver if there is an attack.
It’s not just about cyber attacks if you are working on your site, updating the code, installing a plugin, theme, or core version, and you see some issues and errors with your website. You can quickly rollback to the previous version using the backup.
Components of WordPress websites and its backup types
There are two main components of the WordPress website that you should be considering while backing up your site. They are the files and the database.
- Files contain WordPress core files, plugin files, theme files, configuration files, and upload files.
- The database contains everything else, like user information, posts, pages, links, comments, and other types of user-generated content.
Both together constitute your WordPress website. Now that you understand the components of WordPress it will be easy for you to understand the types of backup and restoration.
It can be divided into two types: Full backup and partial backup restoration.
Full backup restoration is when both the files and database of your WordPress website are stored in another location. This allows you to completely restore your site to its previous state. Partial backup and restoration is where you can restore a specific plugin or theme file. If you are a beginner, go for a full backup and restoration, as partial backups are quite difficult to restore.
Let’s take a look at different ways and techniques to backup and restore your WordPress website:
Restoration with WordPress hosts – Method 1
Most of the Managed WordPress hosting providers come with a one-click restoration. One-click restoration works by accessing backups stored on the hosting provider’s servers and restoring the website to the desired version. This process is usually fast and requires minimal technical knowledge, making it accessible to website owners of any skill level.
There are some limitations to it as well, like limited options for restoration, where you can restore to the most recent backup or a specific date. Limited control where the restorations lead to unintended consequences or incomplete restoration, and much more to it.
Read about Managed WordPress hosting in comparison with self managed hosting in detail, to know more about types of WordPress hosting.
Restoration using cPanel host backup – Method 2
cPanel is the most popular among hosting control panels. This offers a wide range of features and tools that allow users to perform various tasks such as installing WordPress, managing files through a file manager, and creating or restoring backups.
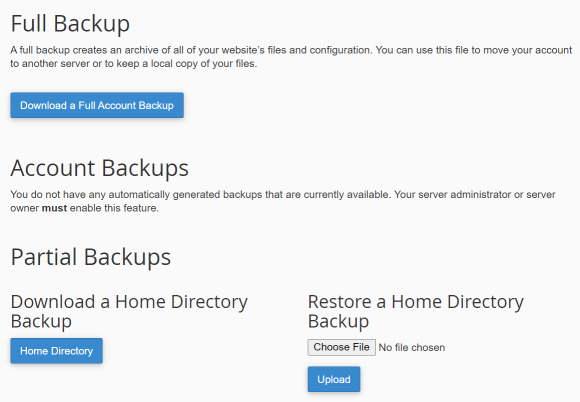
Your web host can offer automatic cPanel backup functionality, depending on the plan and the host you choose.After logging into your hosting panel, you will find a variety of tools divided into categories. Look for the Backup Manager option. If you can’t find it, check the Files category.

The Backup Manager provides access to different backup tools depending on the cPanel setup you’re using. You will see options like Full backup and partial backup. It’s important to note that every cPanel will not contain the same set of tools.
Restoration using a backup plugin – Method 3
Backing up your WordPress site with a plugin might seem like the easiest and most reliable way to backup your website. But there are a lot of things to take into consideration while installing a plugin like
- Features and capabilities: The backup options, schedules, and destinations that can be used with the backup plugin will depend on the plugin’s features and capabilities. If you are willing to spend some extra money, go for a premium or paid plugin to get access to advanced features such as automatic backups, remote storage, and encryption, while the basic backup plugins offer features such as manual backup, local storage, and compression.
- Compatibility and integration: Some plugins may be compatible with the latest version of WordPress, and may integrate seamlessly with the WordPress core, while other plugins may be incompatible with the latest version of WordPress, and may require additional plugins or themes to work properly. So, it is important to check the compatibility and integration before installing a plugin.
- Support: Some backup plugins may provide extensive support like forums, tutorials, and FAQs. Choose the plugin which has good support and documentation, that will be handy if anything goes wrong.
Note: An important thing to remember is that running a backup plugin can use server resources, such as CPU, memory, and disc space, which may slow down your website. Depending on the size of your website and the backup frequency, this could have a significant impact on website performance.
To avoid this issue, some backup plugins allow you to schedule backups during off-peak hours or limit the backup frequency to reduce the impact on website performance.
Using cPanel to backup and restore WordPress manually – Method 4
Restoring Files
Your hosting’s cPanel gives you access to file manager tools. With this feature, you can access both your server’s file directory and the WordPress root folder, which is where all your website files are stored. This includes your site’s media files, plugins, themes, configurations, and more.
To access those files, log into your cPanel account and go to Files → File Manager. From there, you will see an overview of your server’s directories. To find the folder containing your website files, look for a directory named public_html, www, or the name of your website.
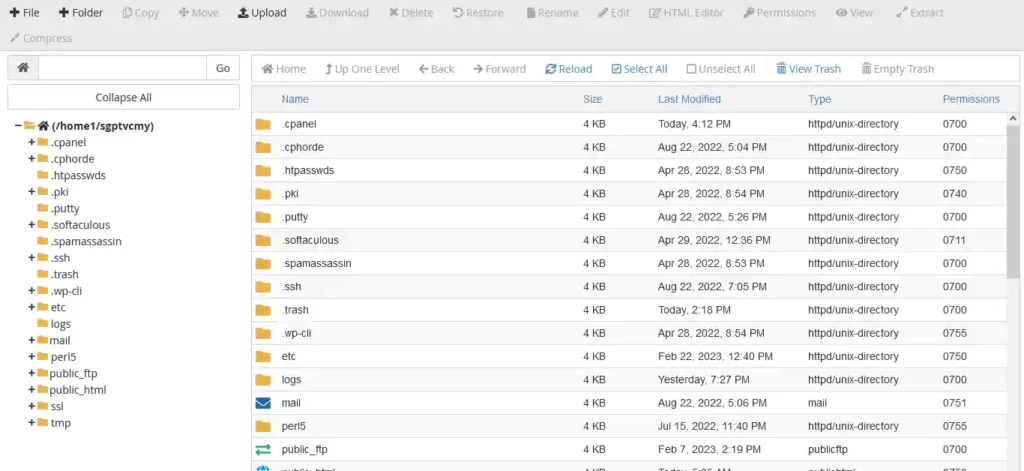
Do not stop yourself from browsing through the content of the folder, but you should stop yourself from editing or deleting any files unless you’re a WordPress pro 😜. Select the folder and click on the Download option on the file manager’s top menu.
To obtain a copy of your website’s files, you can compress the root folder into a zip file and save it wherever you like until you’re prepared to restore it. Alternatively, you can download specific folders by navigating to the public_html/wp-content directory and selecting the folders you want to save, such as plugins, themes, and media files. Downloading these folders individually is similar to creating a typical backup, and you can store them accordingly.

Now for the restoration part, delete the existing folder and then select the Upload option from the top menu of the screen. After unzipping the directory that you previously saved on your computer, upload it to the server and wait for the upload process to complete. It usually takes some time since the website consists of hundreds and thousands of files.
We have finished one part of the restoration process and are now moving on to the next phase, which involves restoring the database.
Restoring Database
Go to your cPanel and go to Database → phpMyAdmin.
phpMyAdmin is a tool for managing databases that enables you to access and modify tables. When you open it, you will see a menu that displays databases based on the number of websites you have.
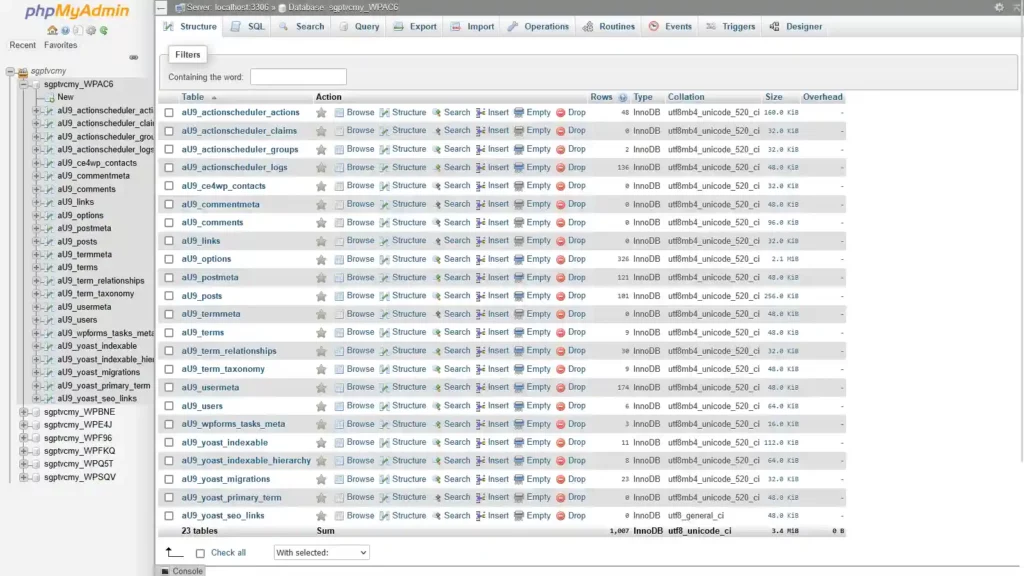
Select the database, and you will see an option called Export on the top navigation panel.
Click on Export and select the Quick option on the next screen. Set the Format: to SQL and click on Go.
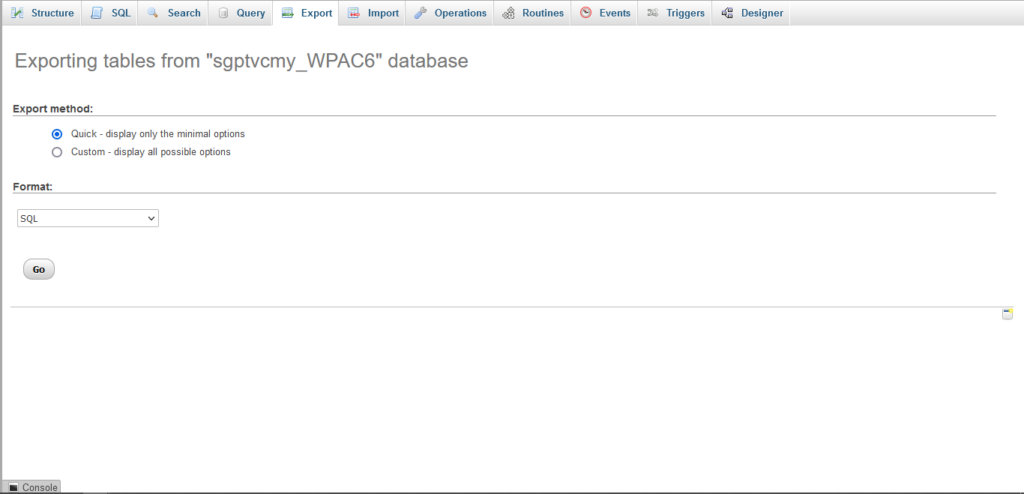
By following these steps, you can download a copy of the database in .sql format to your computer. If you later need to restore the database, access phpMyAdmin, navigate to the Import tab, select the file containing the database, and click the Go button to initiate the upload process.
Note: If you restore only the database or your root folder manually, your website will not return to its previous state. For successful backup and restoration, you need both components. Which makes this restoration process a time intensive one. Additionally, it requires you to store all the backup files in a safe location in an organized manner.
Using FTP to manually backup and restore WordPress – Method 5
This method is like the last one where you download your website’s files manually, but the difference is that you use a File Transfer Protocol (FTP) client instead of doing it through your cPanel.
The major advantage of using FTP is that it’s optimized to help you download a large number of files. Moreover, it’s less prone to errors than using the cPanel file manager.
Attention please: FTP credentials aren’t the same ones that you use to log into WordPress or your hosting control panel.
When you register with a web hosting service, they typically provide you with a specific set of FTP login details. If you’re unsure about what they are, you can check your hosting control panel to find out.
Once you have your FTP credentials, you can use them to connect to your server using a client such as FileZilla. The WordPress root folder should be among them.
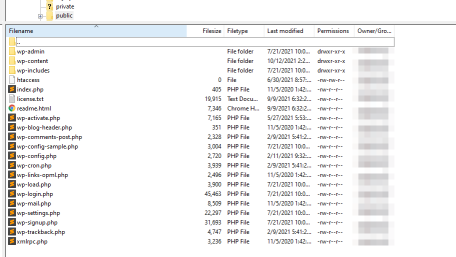
Right click on the root directory and select the Download option. This will download the entire folder, and save it somewhere safe.
For restoration, access the server via FTP, locate the root file, and delete it. Then, re-upload the version you downloaded previously, and you are good to go.
Then export the database separately via phpMyAdmin, just like we did for the manual cPanel backup and restoration.
Use a WordPress Staging site – Method 6
Staging sites are like test dummies used for testing websites. Some website hosts provide additional features called “staging”. This approach allows you to ensure that everything works properly before pushing those changes to a “production” or live environment.
Any changes you would have made on the live site can be made using them, and if they don’t work out, you can easily delete the staging site.
Usually, shared hosting plans don’t come with staging capabilities. However, if you’re using managed WordPress hosting, you probably have access to staging functionality.
Using PaaS for backup and restoration – Method 7
Platform as a Service (PaaS) is a cloud computing model that offers a comprehensive development and deployment environment for creating, testing, launching, and managing applications in the cloud.
PaaS providers offer backup and restoration services as part of their platforms. PaaS providers typically have built-in backup and restore capabilities that allow developers to backup and restore their applications and data.
The frequency of backups, retention policies, and recovery options may vary depending on the PaaS provider and their specific offerings.
Some popular PaaS providers include Google App Engine, Microsoft Azure, Heroku, and AWS Elastic Beanstalk.
Real time backups – Method 8
Real-time backups refer to a backup process that continuously captures and replicates data changes as they occur in real-time, typically with minimal or no disruption to ongoing operations.
In a real-time backup system, data is backed up to a secondary location as soon as it is changed, ensuring that the backup is always up to date. This provides an added layer of protection against data loss, as even the most recent changes are immediately backed up.
Real-time backups are commonly used in mission-critical applications where even a small amount of data loss could have significant consequences. For example, e-commerce sites, financial institutions, and healthcare providers often use real-time backups to ensure the protection of sensitive data.
Real-time backups can help these mission-critical applications maintain data availability, minimize downtime, and ensure quick data recovery, all of which are crucial for maintaining customer trust, reducing costs, and staying competitive in today’s fast-paced online marketplace.
Note that real-time backups can be more costly than traditional backups but can be crucial for maintaining operations and avoiding costly disruptions for a high-traffic website.
What to do after you restore a WordPress backup
Simply restoring a WordPress backup is not enough to fully secure your website. Depending on the reason for the backup restoration, you may need to take additional measures to ensure the protection of your WordPress site.
If your website has been hacked, identifying the source of the attack can be difficult. However, it usually boils down to one of these reasons: weak administrative credentials, insufficient database security, an outdated WordPress version, or outdated themes and plugins.
You can read about the Common mistakes WordPress users make and how to avoid them.
WordPress Backup Strategy – Rule of 3
A frequently used backup strategy is to maintain three backups of your website, where two of them are stored locally and the other one is stored offsite. This way, if anything happens to your website, you’ll have multiple backups to restore from, ensuring that you don’t lose any critical data. Do you understand?
So what’s an example? Here’s a backup scenario that meets the 3-2-1 rule. Store a copy of your site on:
- Your personal computer
- An external hard drive / USB drive
- A cloud storage provider like Dropbox or Google Drive
While it might seem like too much, this backup plan ensures that you’ll always have access to a viable backup unless there’s a global disaster.
I hope that I have covered all methods to backup and restore your site, choose the one that suits you the best!
FAQs
Backing up your WordPress site is crucial in case of any data loss or website crashes. It helps you restore your website to its previous state and prevents you from losing all your content, media, and settings.
It is recommended to backup your WordPress site daily or weekly, depending on the frequency of updates and changes made to your website. If your website is a blog, taking backups twice a week is more than enough, but if it’s an eCommerce website, then real-time backups are recommended.
There are several ways to backup your WordPress site including using a backup plugin, using a hosting provider’s backup service, or manually backing up your website files and database.
Yes, you can backup complete website or only certain parts of your website such as your database, media, files, themes, and plugins.
The optimal method for backing up your WordPress website is not a one-size-fits-all approach. There are numerous backup methods available, all of which have been discussed in this article. Therefore, you should select the backup method that best fits your needs.


No responses / comments so far.