We’ve all heard the phrase ‘Images tell a story’, haven’t we? Just why is that said so? Because images possess the remarkable ability to evoke feelings and intrigue. They have a unique power to generate narratives within our mind. Images are more captivating than text and convey information in a rather compelling and aesthetically pleasing manner.
Incorporating Images plays a significant role in elevating the engagement and visual appeal of your website. In this article, I will guide you through the process to create an Image Gallery in WordPress in this tutorial. Together, let’s transform your website into a visual masterpiece!
Why Create an Image Gallery in WordPress?
Why create an Image Gallery in WordPress, you ask? Well, adding an photo Gallery to your WordPress website is an effective way to vividly showcase your products, memories, artwork, or any other visual collection. Galleries allow you to organize and present images in an appealing manner.
With WordPress, it is simple to create stunning Image Galleries, and leverage the compelling strength of visual content to connect with your audience!
Using Gallery Block to Create an Image Gallery in WordPress
Organizing multiple images is made easy with the help of Gallery Blocks. With the help of an Image Gallery on WordPress, you can conveniently categorize and group your pictures.
The method to create an Image Gallery in WordPress is quite simple, just follow these steps –
Step 1 – Click on the Block Inserter that appears when you hover over a page/post in WordPress.
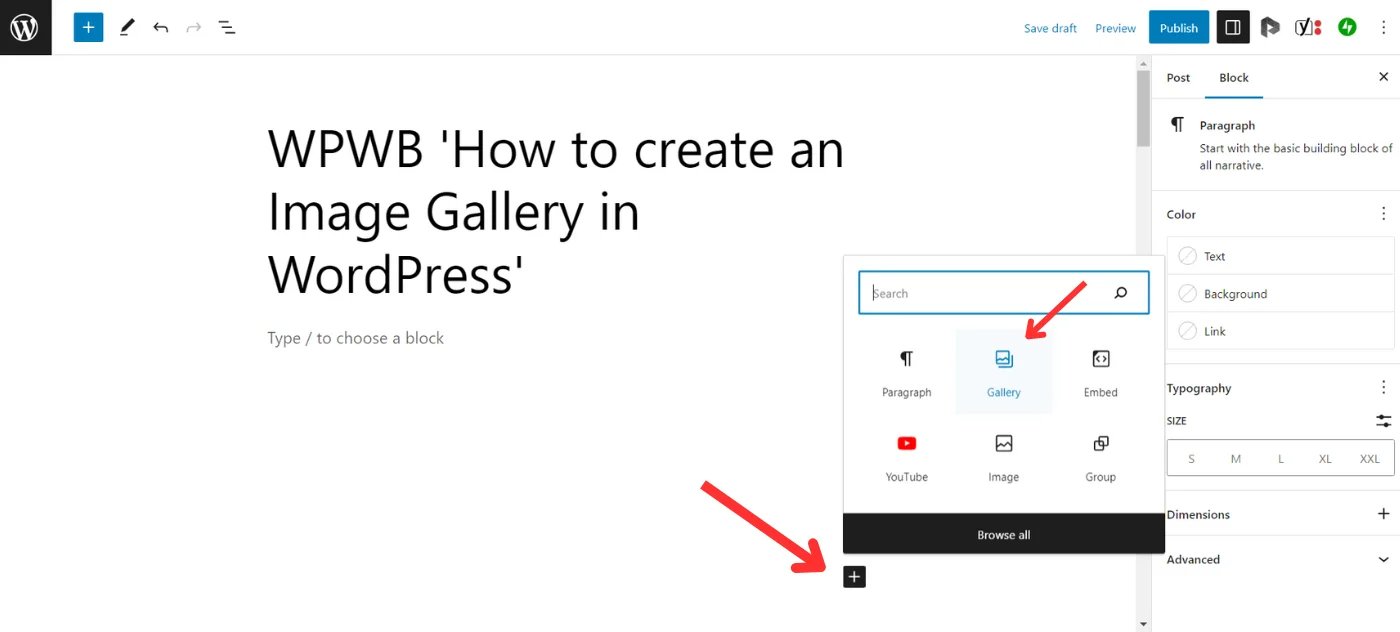
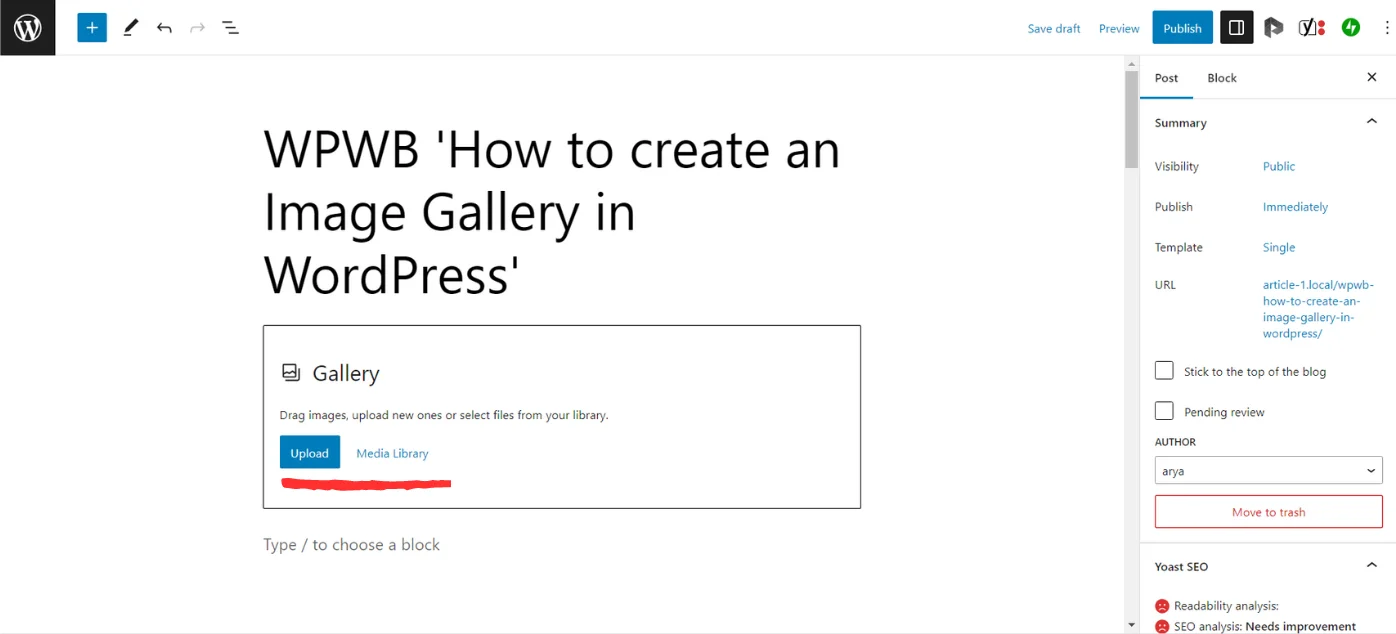
Step 2 – Select the ‘Gallery’ Block. You can either Upload Images from your desktop or select files from the Media Library.
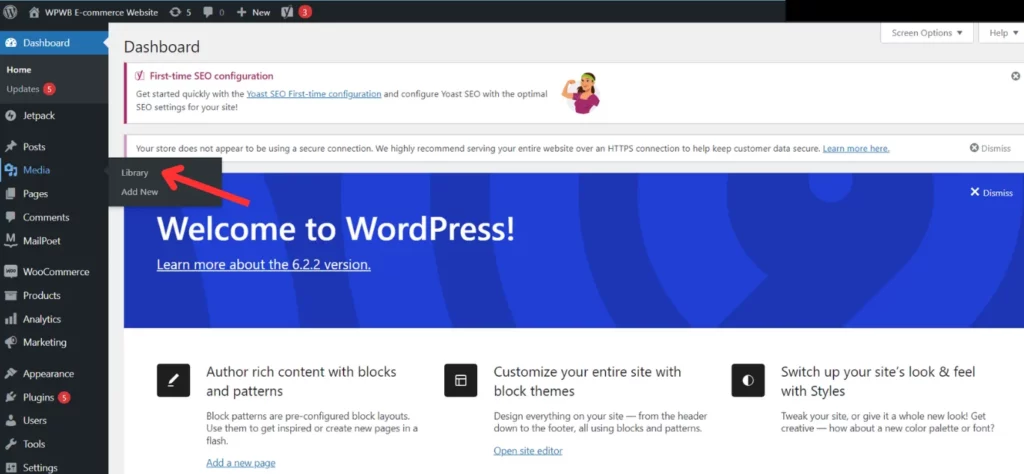
Step – 3 To upload files to the Media Library – Hover over ‘Media’ on the WordPress Dashboard and click on ‘Library’.
Step – 4 Next, Click on ‘Add New’. Select Files from your desktop or Drag and Drop the required images.
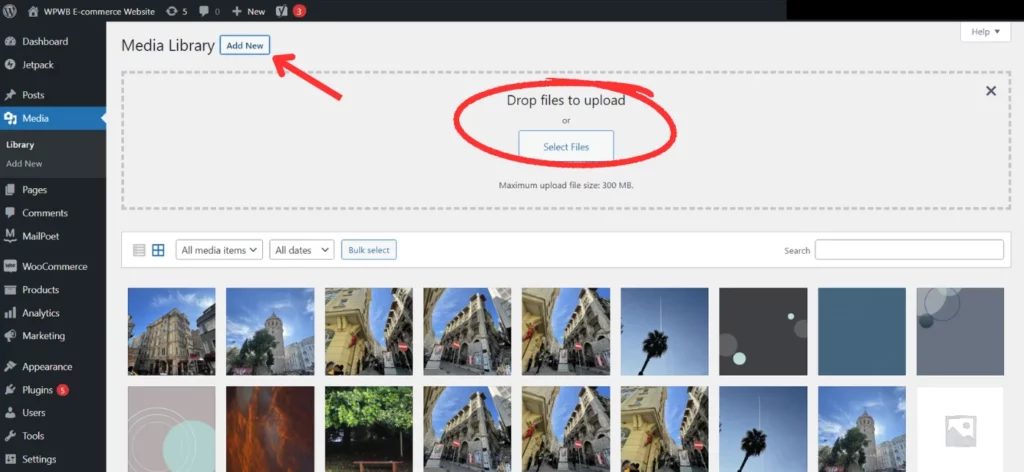
Step – 5 Now that the images are ready, select those from the Gallery Block and WordPress automatically puts them in a Gallery for you!
To upload files directly from your computer, simply click on ‘Upload’ when on the Gallery Block, select the images and ‘Open’. Again, WordPress auto-arranges the selected images into a gallery for you!
Additionally, you can select the Image Style to be ‘Default’, which is Rectangular or ‘Rounded’, according to your preference. You can also align the images, insert a caption or a link, and apply a duotone filter through the Gallery Block Toolbar Option.
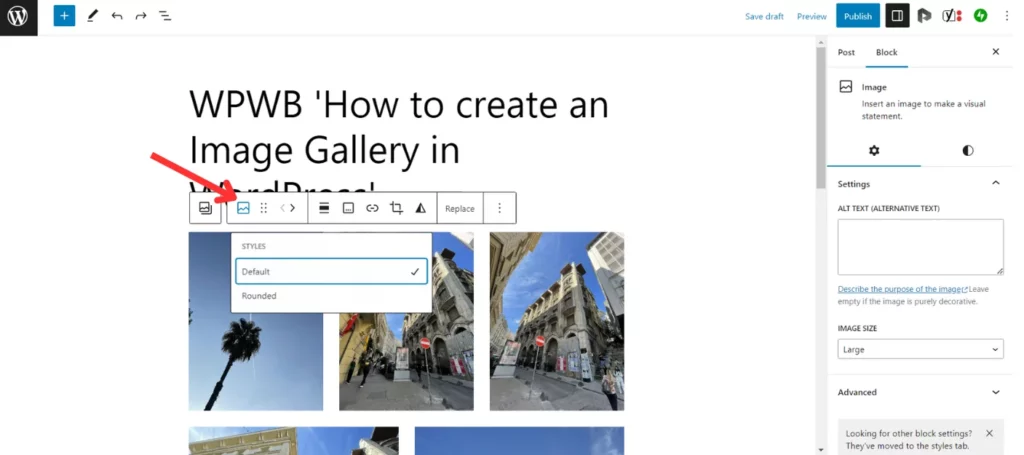
There! Wasn’t that easy! If you have many images that you want to showcase on your website, the Gallery Block enables you to add as many images as you want and also to create multiple galleries on a single page.
For visual learners, here’s a video tutorial by WordPress – ‘Add an Image Gallery’
Using Plugins to Create an Image Gallery in WordPress
Why use Plugins when WordPress has given you such a convenient option to create an Image Gallery? Well, even though the Gallery Block Method is simple, it is quite restrictive as WordPress auto-arranges the images in a layout for you.
If you wish to customize your layout and sizes and make use of added features, you need a Plugin!
Time needed: 1 minute
Let’s see how you can use the Envira Gallery Plugin to create an Image Gallery in WordPress. Let’s go!
- Install and activate the Plugin.

- Select ‘Envira Gallery’ located on your Admin Panel. Click on ‘Add New’

- Give a title to your gallery. Next, upload your images to the Native Envira Gallery or opt to build a gallery from your Instagram photos – this is a paid feature though.


- After the images are uploaded, now’s the time to set up configurations. In this section, you can customize your gallery by adjusting the number of columns, layout settings, image sizes, and enable lazy loading, among many others.

- In addition to that, you can enable the LightBox theme for your gallery and adjust the Miscellaneous settings.


Envira Gallery also offers extra features such as Video and Social Sharing Addons or Mobile responsive galleries, but these come at a price.
Aside from this, there are thousands of plugins – both free and paid – to choose from the WordPress Plugin Library. Harness the powers of these plugins to create the best-suited Image Gallery for your WordPress website. To begin with, try these – NextGEN Gallery, Photo Gallery, Modula Image Gallery, and Rbs Image Gallery.
Additional Features : Dynamic, Category and Thumbnail Plugins
Once you know how to create an Image Gallery in WordPress, you can now explore and utilize the different functionalities plugins offer to further elevate your Galleries and provide your audience a Visual Feast.
A Dynamic Image Gallery
A Dynamic Image Gallery changes or updates its content over time. For example, a dynamic image gallery might show a different image every day, or it might show images that are related to current events.
If you are looking for a way to add visual interest to your website or blog, a dynamic image gallery is a great option. Many plugins offer Dynamic Addons which help you create a gallery that is dynamic, choose whichever suits your needs the best. To start with, try these – Envira Gallery Dynamic Addon, Elementor Dynamic Gallery Addon, FooGallery Pro Version.
An Image Gallery with Categories
Some plugins allow you to create a gallery of images that can be organized into categories. This can be helpful for organizing a large number of images, or for making it easier for users to find specific images. These plugins typically provide a way to add images to the gallery, and then assign them to categories. Some of the many plugins that offer these features are – WonderPlugin, Categorized Gallery Plugin, Robo Gallery, Modula Gallery, etc.
Thumbnail Plugins
Thumbnail Gallery plugins allow you to display small versions of your images, which makes it easier for visitors to browse through your gallery. They can be used to display images in a variety of ways, including slideshows, grids, and carousels. Some plugins also allow you to add captions, descriptions, and links to your images. Here are some of the most popular WordPress image gallery thumbnail plugins – NextGEN Gallery, Jetpack WordPress Photo Gallery, Envira Gallery, etc.
Display Your Newly Created Image Gallery in WordPress with Pride!
This article was a tutorial on how to create an Image Gallery in WordPress. I have given you a step-by-step guide on creating an image gallery on WordPress. Utilize the various methods and techniques that will assist you in setting up an impressive image gallery that will enhance your website’s aesthetic appeal and captivate your audience!
To explore the depth of features WordPress offers, read our selection of ‘How to’ Articles!
Your Top WordPress Image Gallery Creation Questions, Answered!
You can add a photo gallery to WordPress using the built-in Gallery block. The block editor in WordPress makes it easy to create a photo gallery without the need for any additional plugins. Simply upload your images to the media library, insert the gallery block, and choose your photos. You can further customize the gallery by adjusting the settings or with custom CSS classes.
Sure, you can turn images into a gallery in WordPress. There are multiple ways to build galleries on your WordPress pages and posts. The Gallery Block instantly creates a gallery and allows you to select images and customize the layout. You can also use custom CSS classes and HTML codes, Shortcodes, or install Plugins to turn your images into a gallery.
Ratings and active installation data show that ‘NextGEN Gallery’ is the best WordPress Gallery Plugin. Be that as it may, there are many Gallery Plugins available in the WordPress Plugin Repository. Explore and find the one that works best for you!


No responses / comments so far.